Showing posts with label Clicks not code. Show all posts

Friday, March 29, 2013

Dataloader.io

Dataloader in the Cloud

Are you a Salesforce.com Administrator? Do you use Linux or Mac? Are you frustrated with the options to use for Dataloader? Setting up WINE or using Lexiloader can sometimes can be frustrating because it was not made by Salesforce. Well kiss goodbye to your frustrations. 


Introducing Dataloader.io, dataloader.io is a tool that works 100% in the cloud, so irrespective of your operating system it just works. You can now do everything that DataLoader can do and more. Dataloader.io allows you to Save upserts and queries for later use. It also keeps a history of what you have done so you can refer back to it, in the event that something goes wrong.

  • Tired of scrolling through the list of Objects in your organization to find the right one? Dataloader.io has a simple search field to find it fast.
  • Tired of looking for the right field for data mapping? Dataloader.io has a searchbox for that too.
    • Not only that but if your fields in your CSV are close matches Dataloader.io will do a simple automapping for you.
    • Dataloader.io is great for mapping lookups for matching values. You can use the lookup field and access almost any field on the parent object to use as a match. This is GREAT! It means that you don't have to rely on Account Id's or things that might not make sense for the match. 
  • Best of all Dataloader.io makes it simple and easy to use.
This is just a short blurb, but I love this tool and I use it all the time.

Watch the video if you are still not convinced:


Friday, March 22, 2013

Email to Case

On Demand Email to Case

Salesforce.com offers two different ways to handle inbound email to case. By far the easiest to setup and manage is the On Demand Email to case. It can be setup with virtually no training, you don't need to know anything about SMTP or IMAP or POP or anything else that sounds like intimidating mail related lingo. You don't technically even need to have access to the mail server itself. Salesforce.com on Demand email to case has a few simple setup steps that are as follows:
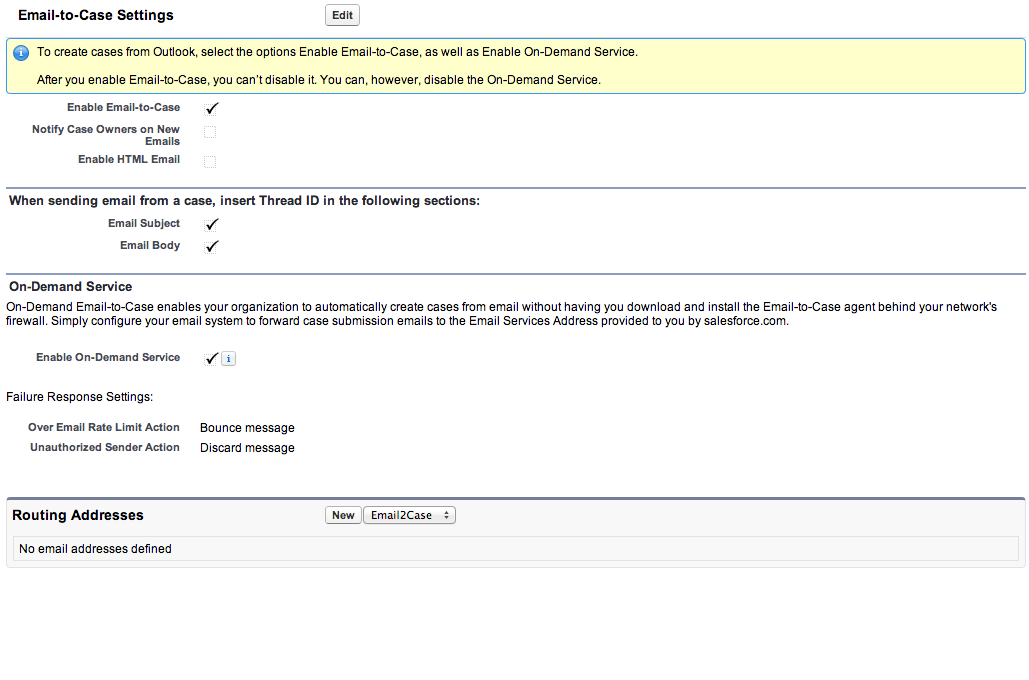
  1. First go to Setup-> Customize-> Cases-> Email-to-Case and click the edit button
  2. Check "Enable Email-to-Case
    1. This will make the "Enable On-Demand Service" available below on the same page. Select that too.
    2. You can also determine if you want to allow HTML emails in the system or if you want case owners notified of new cases when they come in, but this is optional and not required at this time. If your not sure what this means, then take a look at the SFDC Email to Case documentation found here.
  3. Hit Save
  4. Now you will have a new section as shown here that will appear below the Email-to-Case settings: 
  5. Setup a Routing Address by clicking the "New" with the drop down set to Email2Case.
    1. You will now be prompted to give the address a routing name. This is what will appear on the outbound emails or replies from that address. You may want this to be something like, "My Company Name Support" 
    2. The email address is what is prompted for next. You can use any email address you want, so long as you have access to the inbox you can use it. Remember you don't have to setup email to case with a mail server, although it is not a bad idea to do so. The point is that you don't have to.
    3. Save email headers
      1. Why would you want this? Mostly this is just something that you can use to evaluate the original header of the email. This is typically used in setting up rules for spam control. If you are using a mail server, you might not care to use this option as the original message should contain this detail on your mail server.
    4. Accept Emails from:
      1. This option actually allows you to make your inbound email to case inclusive only. This is extremely powerful if you only want to accept email from one domain address or specifically one address. You can put things like, "gmail.com" or "justtesting@none.com" You may also use commas to separate input.
    5. You can have every email that enters the system create both a Task and a Case. This can turn out to be a lot of overhead and extra work, so I wouldn't recommend that you select this setting.
    6. Set a default priority for the case as it comes in from that email address. This is especially useful if you do any type of Quality of Service or (QOS) by email address. For example if you had a "SUPER IMPORTANT CUSTOMER SUPPORT" email alias, you would want that to have a case priority of HIGH while other cases maybe come in at LOW or MEDIUM.
    7. The next step seems silly, to select a case origin. You are setting up email to case, the origin is obviously email, right? Well, not in every case. What this allows you to do is setup an EXTREMELY inexpensive integration. In this way you can leverage email to case to handle emails coming from a different system. Then maybe your Case Origin would be "Customer Portal" or maybe its an internal case and the origin would be something like, "Finance". At any rate you have options.
    8. Select Record Type
      1. NOTE: This option ONLY appears if you have more than one record type setup already. But this can be handy if you want to have you assignment rules do different things based upon record type of cases as they come into the system.
    9. Click Save.
  6. You should have got an email from SFDC in the inbox of the email address that you specified.
    1. Click on the activation link. It should take you to a pretty page like this:
  7. Now that you have verified the email address and setup everything in SFDC your done, right? Wrong! How are the emails supposed to get to SFDC? You have to setup a forwarding rule in your inbox or on your mail server.
    1. There are many ways of doing this, but the basics are as follows. Now that you have your address verified in Salesforce, go back to Setup-> Customize -> Cases ->Email-to-Case and copy the "Email Service Address" that appears on the right hand side of your newly setup email address.
    2. Take and setup forwarding inside of your email client or mail server to forward all emails from the original address to your Email Service Address. This will make sure that when you send an email to the address it ends up in SFDC as a case.
  8. You're Done!
You have now setup Email-to-Case for on Demand. This is the best option for setting up email in Salesforce.com to do using Clicks and Not Code. The biggest limitation to this option is that there is a 5MB cap on attachments. Salesforce will not process inbound emails for on-demand email-to-case if the attachment exceeds 5MB. 

Salesforce also offers a second option for Email-to-Case, that allows for larger sized attachments, this can be done through just "Email to Case" but is NOT on demand. For instructions on how to set this up, please go here.  A word of caution with this option, it is NOT supported by Salesforce. If it is not working, it is up to you and your IT staff to figure out why. This also is a complex setup that will require more technical resources to be involved.


Friday, December 23, 2011

Salesforce Tools for Mac OS-X Mass Update Anything

Mass Update Anything


One tool that I have found, I cannot live without is Mass update anything. It is available on both Mac and Windows, although they are slightly different on each operating system. Mass update anything is a very simple app that allows you to specify criteria to pull down and update through the API. This is very nice for anyone without a lot of coding experience and just needs to make quick updates to a lot of records.

Here is a link to the force.com page.  Here are a few screenshots of the tool on OS-X.

Query Builder allows you to  select the object and dependencies that you want to select the information you want to update. This will format the query for you, so you don't need to know or understand SOQL to create it.

Thursday, December 22, 2011

Can I push a profile from Sandbox to Production?

Yes, pushing a profile from Sandbox to Production can be done. It is not possible to push through the Deployment Manager in Salesforce. The inbound/outbound change sets is still new and fairly limited. The meta-data for Profiles can be brought in using the Salesforce IDE. It is important that you bring down all elements that are included in the profile that you are pushing. Personally I just bring down everything that is available in the IDE meta-data in case I ever need it. Here are some simple steps to push the Profiles through the IDE.


  1. Download and Install Eclipse IDE for Salesforce. You may find it here.
  2. After setting up the IDE, create a "New Project" (File->New->Force.com Project
  3. Give your project a name and description, enter your credentials to your sandbox.
  4. When asked to select the metadata components, select the option for "Selected Metadata components" and click choose.
  5. For ease of use, choose "Select All". This will bring down all metadata and may take some time to complete depending on the size of your org.
  6. Click, "Ok" then "Finish"
  7. You should now have all the elements that you need to deploy your profiles to production. You may do so by clicking on the profiles folder under the project to select it.
  8. Once selected right click and select in the menu "Force.com->Deploy to Server"
  9. Enter the proper credentials for your Production Environment and select the desired profiles from the menu.
That's really all there is to it. Ensure that you keep your IDE Project up to date and accurate so you don't push old settings by using the "Refresh from server" option often.

Friday, November 4, 2011

Salesforce Tools for Mac OS-X Lexi Loader

As most of the products made for Salesforce.com are designed with Windows users in mind, if you use a mac you may feel like you are getting the short end of the stick sometimes. I know that I did at first. There were cool things like the data loader, the excel connector and the outlook connector; that just didn't exist on the mac. Well here are a few of the tools that I have found that help those Mac users out there feel like we aren't all alone. I will highlight several tools over the next handful of posts that I make to the blog. 

Just to point out the great work that has been done. These tools are mostly if not all developed by our friend Simon Fell. Check out his site Pocket Soap.

The first tool that is essential for all administrators is the Data Loader. Unfortunately Salesforce has not yet implemented a Data Loader for Mac users. At the current pace, I have my doubts that this will ever happen, but if you do get a chance vote up this idea on the idea exchange. The solution was provided by Simon Fell.

Lexi Loader
Lexi loader is a great tool designed specifically for the mac. It does everything that the data loader can do. That is, Inserts, Updates, Upserts, Deletes,  and Exports. Overall a great alternative to trying to run Data Loader in a VM.

This tool follows almost exactly the same format and setup that the Data Loader does. The only real difference that I have been able to find between the two is the distinction for Hard Deletes that is made within the Data Loader. I don't often use Lexi Loader for deletes so I am not sure at this time how Lexi Loader preforms deletes. Enjoy this great tool!

Monday, October 31, 2011

Submit for Approval Button

The other day I was looking for a way to create a button for submitting a record for approval I wanted to do this so that I could have it on the top of the record instead of in the related lists. I found a bit of java script that allows me to do this in a custom button. For those of you that are looking to do this it's very easy to do. Here's how:


  1. Go to your object and select the Buttons and Links section.
  2. Click to Create a New button.
  3. Give the button a name
  4. Choose a Detail Page Button 
  5. Select Execute JavaScript as the behavior.
  6. Select OnClick JavaScript as the Content Source
  7. In the code area enter the following code block. *Please note that you can edit the pop alert text to fit your scenario as well as change the name of the object to the object you would like to work with. In this example, I am using the Case object as an alternative means for escalating cases.*

    {!REQUIRESCRIPT('/soap/ajax/23.0/connection.js')}
    
    if ((Modal.confirm && Modal.confirm('Once you escalate this case, you must recall the approval before you can edit it. Continue?')) || (!Modal.confirm && window.confirm('Once you submit this case, you must recall the approval before you can edit it. Continue?'))) navigateToUrl('/p/process/Submit?id={!Case.Id}&retURL=%2F{!Case.Id}');
    

  8. Finally Add the button to the page layout.
Please note that this button will only work if you have an approval process setup for the object that you are creating it on. If there is not one, the button will obviously not submit the record through an approval process that does not exist. 

Thursday, October 27, 2011

Cross Object Formulas

I have found that using Cross Object Formulas is an extremely helpful way to make updates within Salesforce.com. A big problem that I have run into with Salesforce.com is the inability to track back through the owner of the record to retrieve information from the User record on the current record in question.
For example, I have a need to know what Role an owner of a case has in order to perform some additional logic. Ideally, I would be able to track up through the owner as it is related to the case already. Unfortunately Salesforce does not allow us to do this.
Fortunately using Cross Object Formulas we can get around this. Here is a simple way that I have been able to use the Current User to identify the role of the owner on a record.

This example is how I pull the Role for the Current Owner of the record.

  1. Create a new text field to store the Role on the case record.
  2. Create a new workflow on the case object that is updated Every time a record is created or edited. It should also have a rule criteria of  Not( ISNULL (CreatedDate)). Essentially this will cause the workflow to fire every time the record is touched.
  3. Next we create the field update. Here we can use this syntax If(Ownerid = $User.ID, $UserRole.Name, Priorvalue (Owner_Role__c)) Essentially what we are doing here is performing a check against the current user who is editing the record. If they are the owner of the record then it will pull the Owner Role from their user record. If they are not then it will leave the field that we created with whatever the prior value was.
Activate your workflow and you should be good to go. The great thing about this is that it follows strictly to the security policy of Salesforce, so you have to actually be the owner of the record in order for this to work. Logging in as a user will not work to trigger the update. You can do a similar operation with any of the User record fields even custom fields using the Current User selection.

Wednesday, October 26, 2011

Salesforce.com Entitlements

For those of you looking to understand a little bit more about Salesforce.com Entitlements and how it works for the service cloud, here are a few things that I discovered as I worked to enable it for my org.

Milestones do NOT auto-close, so if you are looking to use Entitlements as a way to track SLA's on cases, you will need to implement some code. Never fear, most of the work has already been done for you on Developerforce.com. Here are some links to some code that I found helpful in implementing entitlements:
  1. http://wiki.developerforce.com/index.php/Case_Milestones_Utilities_Class
  2. http://wiki.developerforce.com/index.php/Auto-completion_of_Case_Milestones_with_Triggers
  3. http://wiki.developerforce.com/index.php/Auto-completion_Resolution_Time_Milestones_with_Triggers
I realize that this is code that you would have to use to do this, but I have found really no other way. It's almost as though Salesforce took us 90% of the way and stopped for some reason. I'm not quite sure why.

The next problem that I ran into with Entitlements is deployment. I already developed the entire thing within my Sandbox and then I wanted to deploy to production through Change Sets. Big problem, I see no way within the declarative interface to deploy entitlements from one org to another. I checked using Change Sets and Creating a package and I found nothing. I was DEVASTATED. How could I possibly have done all of this work in getting everything just right to find out that there is no way to move that work from my Sandbox to production. I then went through the tedious task of moving data manually from one sandbox to another. It wasn't until after I deployed all of this work that I found another way.

I have not yet been able to fully test this but, if anyone does, please let me know if it works for you. You simply have to use the Salesforce.com IDE. Entitlements are a meta data component that is not pulled automatically when you setup a new project. So here are the steps to do it:
  1. Open the Salesforce.com IDE and create a New Project
  2. Name your project whatever you choose, enter your credentials and security token and click next.
  3. Now on the next screen select the option for "Selected metadata components" and hit choose.
  4. You will notice after the IDE fetches the metadata that there are a lot of things available for selection here that may make life easier. We are going to specifically go and get the Entitlements Metadata. You can do this by clicking on the checkbox that appears to the left of "Entitlement Templates"
  5. You should now be taken back to the project page and it should look like this:
  6. Click Finish
You should now be able to deploy this through the IDE. Please remember that I had to do mine manually and have not had a chance to test this since. For anyone that does please let me know if this works for you.