Showing posts with label SFDC. Show all posts

Friday, November 20, 2015

Fun with Formulas: Clickable Links

Clickable Links; How To:

One of my favorite tricks to use with formula's is creating a clickable link. Often I find that I want to have the link visible in a list view or in a report, in these scenarios a "Custom Link" just won't do. For this I look to creating a clickable link.

How is this helpful?

In many different ways this can be helpful or applicable. Imagine, you are a Sales rep, as a good sales rep does, you have a report of your top 100 clients. Each one of these is a contact, whom you want to stay in touch with regularly. The traditional way of handling this in Salesforce would be to click into each contact from the report, call them, and add the task to the contact saying that you have just called then and what you talked about. What if you could click on a custom link from the report called, "New Call" that would create a new task Record with various data points about the contact right from the report?

That would be a game changer, right?

How can I do it?

The execution is quite simple. I'll outline it in the following steps:
  1. Create a Formula Field (Type Text)
  2. Add the Merge Field Values to the formula
  3. Add the Hyperlink Syntaxt to your formula
  4. Expose to users/Add to a report.
Now that we know the overview, let's walk through this.

Walkthrough:

Step one, you should be familiar with, creating a new formula field of type text as shown below. We want to make sure that you put this field on the Contact object so that it can be exposed on Contact reports to fulfill the example scenario given above. Here's what it looks like so far:


Notice that I've named my field, "New Call" as to help my end users find it easily when adding it to reports. This way they know exactly what the field is for, simply by making my naming make sense. I didn't call it "New" which would be confusing to my end users as they don't know what they are creating that is "New".

Now on to the formula, what do I need to create a new task record in salesforce? 

This part is simple, and you can do it by looking into your address bar when you go to create a new task. 


Notice the "/00T/e" this is what will place my browser in the "Edit Mode" for the creation of a new Task. The /e is salesforce for "Edit" and the /00T is salesforce for "Task" all standard objects have something similar to this when you create new.

So I know I want my page to go here, so I'll add this to my formula. I'll also add the ? to my formula as this is necessary to begin passing in my field values to my new task I'm creating.

So far my formula is very basic, it looks like this:


But I don't want this formula because it would only display the text of "/00T/e?" which would mean nothing to my end users. I want this formula to be valuable, so the next thing I'm going to do is start adding my parameters that I want my URL to pass into my new task. I can do this with merge fields. If you remember the URL from above, you can look and see that a few fields are bing populated already for me. Can you tell which ones?

If you guessed, "Subject" and "Contact" you would be correct, and I would be impressed that you figured that out. It's not so simple with tasks as with other objects. There is a lot going on in this URL. Let's break it down so we understand it:


Well, we allready know that /00T/e? is creating a new task, putting us on the edit page and is ready for input value parameters to be passed.

What does, "title=Call" mean? Well, it means that you are creating the "Call" type of task. The same one you would get when you click on the "Log a Call" link from a Task related list. This also sets the status of the activity to "Completed" by default, so your users just need to fill in details.

Next, what is the "who_id" and what does that mean? Simplistically, that is the "Name" field, and the id you are passing is the id of the contact. This will auto-populate the contact in the Name field for you.

What is "followup=1" and what does it mean? The followup=1 is what allows you to create a follow up task at the same time as logging your call. You can remove this and just have your users log the call with no follow up.

Next is "tsk5=Call", this is the cryptic name for the "Subject" field. Very intuitive right? Right, well at any rate you are pre-populating the subject line for your end users. You could change this if you would like to "Call to Client", instead of "Call". Or "Phone Call" or anything you'd like really.

Finally, last but not least is the return URL. Where should your users be dumped after they have clicked save or cancel? Right now it's pointing to the contact record id. Meaning it will place them on the contact record. I could put this to the report id if I wanted, or the home page or anywhere else. For our example I will put it to the contact record as it makes the most sense to me. In order for this to work we have to include the %2F in quotes before the merge field Id. 

Here is how my formula looks now that I've added the above parameters:

Notice the quotation marks and the & that I've added. The quotation marks are going to be important in making the breaks between exact text that you want to pass into the URL and the merge fields that you have. For example, the first set of quotation marks starting at "/00t...and ending at id=" allows me to then put in the merge field of Id. Since I'm creating this on the Contact object, it will be the contact Id. The & symbol is used to connect the various pieces of this formula. If you don't get these right the formula will not work.

As you can see I have "&Id&"&. This is essentially connecting my merge field to the front and back halves of the URL. The third & symbol is a continuation of my URL so that I can add another field that I want to populate. You MUST do this everywhere that you are going to populate fields with a merge field. That said, note that my last merge field at the end of the URL is simple "&Id. Effectively I've ended the URL so I don't need to attach it to anything else.

Now that I've added all of my merge fields, we simply want to make this a HYPERLINK formula so that the link will be clickable. I can do that by selecting the HYPERLINK formula on the right in the formula box. Then select insert function:


You should get a pre-formatted formula that looks something like this:

We are going to take and replace the part that says, "url" with the url that we have just built in the above steps. Then we are going to replace "friendly_name" with "Create New Call" (make sure to include the quotation marks. Finally we are going to remove the square brackets and replace the word target with "_parent". This will allow the link to open in a new window. If you want it to open in the same window you can use "_self" instead.

Here is what that looks like:

Now you've created the field. You want to make it visible to all of the users that you want to be able to use it, but you probably don't want to put this on a page layout. This is better used in list views or in reports so that the sales users can have a list of contacts they are contacting and work their way down the list.

Tuesday, January 28, 2014

Formula How To's: How do I extract an exact value from a comma separated list?

How do I extract an exact value from a comma separated list?

Recently, I was presented with the challenge of trying to extract an exact value from a comma separated list. In my scenario, I was trying to identify that one of the values in the list, was an exact match to a specific value on the current user's record. 

Why would I want to do this? Specifically, this allows me to use a "True" or "False" value in a list view, report or dashboard to display records. This presents the idea of a "dynamic" list, report or dashboard that is specific to the user viewing the list, report or dashboard without changing the data or the parameters thereof. 

Scenario:

As previously stated, I had a field that was a concatenated comma separated list. In my scenario this field was being set by a trigger, but regardless of how the data gets in the field the idea is the same. Next, I had a field on the user record that may have been a value in the comma separated list at anyone time on any given record. 

Formula:


AND(
If( 

/*Checking to see if the initials are here at all*/
Contains(Field_Im_Looking_at__c,$User.User_Field_value__c)
, True, False),
OR(

/*Checking for an exact match in the first set of values*/
IF(Find($User.User_Field_value__c+',', Field_Im_Looking_at__c)>0, TRUE, False),

/*Checking for an exact match somewhere in the middle. */
IF(Find(','+$User.User_Field_value__c+',', Field_Im_Looking_at__c)>0, TRUE, False),

/*Checking for an exact match at the end of the string */
IF(TRIM(RIGHT(Field_Im_Looking_at__c, LEN($User.User_Field_value__c))) = $User.Field_value__c, TRUE, False)
))

Break it down:

Ok, so breaking down this formula, I've changed the field names to "Field I'm Looking At" and "User Field Value" for simplicity sake. In the "AND" statement, I am looking to see if the value even exists within my set of values, and then the second condition contains my "OR" statement which searches for my exact value. You might not need the "AND" statement at all, and could probably do this with just the "OR" statement, but this worked for me and so I kept it like that.

Within the "OR" statement, I am checking for three conditions. They are:
  1. Is my value the first value in the list?
  2. Is my value a middle value in the list?
  3. Is my value the last value in the list?
The first two values are fairly easy to search for because I know that my value will look like: "VALUE," or ",VALUE," it's important to recognize the commas here. They are what ensure you are getting the exact value and not a partial value.

Note: If you have the scenario where a partial is possible with the end of the value (or in other words the first value in your list has a potential for being a partial), you might want to modify the first if Statement to be something like:

IF(Trim(Left(Field_Im_looking_at__c, LEN($User.User_Field_value__c))) = $User.User_Initials__c, TRUE, False)

In my scenario this wasn't possible and so I did not account for it.
What does that do? Well, simply it takes the value from the user record and trims everything but the number of characters for the value you are looking for. It then will compare the two values to see if they are a match. If they are, then you get a "True", if not you get a "False".

Application for use:

Now that I have this formula, I inserted it into a Formula Check box field. Now my users can leverage this field in list views simply looking for a "True" or "False" value to know if the records are applicable to them. This cuts down on a lot of complex reports and filtering for my end users. I hope it's helpful to you and as always this is one more thing that you can do in clicks and not code.

Tuesday, May 21, 2013

Summer '13 Release Series: Customizable Price Books

Customizable Price Books:

Price books in Salesforce have always been a bit limiting. They have been static and difficult to use because you couldn't customize them. Well with Summer '13 that is all going to change. Now you can add fields, track history, validation rules, field sets, record types, and triggers on Price Book records. There is also a handy dandy new Price Books Tab in Summer '13 (But you do have to enable it if your org isn't new).

  1. Adding new fields or updating Price Books is just like you would for any other object. Go to Setup->Customize->Price Books
  2. Adding the new Tab is something you don't really need to do that often in Salesforce. Usually it just appears and all is good with the world. In this case you have to "Enable" it. Which is odd, but whatever. Here's what you do: 
    1. Pull up the profile that you want to enable the tab for, then click edit. 
    2. Go to the tabs section and find Price Books. Change the Tab value from "Default Off" to "Default On" and it will become visible.
With the Salesforce Summer '13 release this is just one more thing that you can now do in Clicks and not Code.

Monday, May 20, 2013

Summer '13 Release Series: Opportunity Splits

Opportunity Splits:

In the Salesforce.com Summer '13 release it is now possible to create Opportunity Splits. This is a feature long waited for, that we have seen hit pilot once before but was never official G.A. Now it is, and here is what you need to know:
  1. There are two different kinds of opportunity splits. They are:
    1. Revenue Splits, which must equal 100% of the opportunity amount. These are typically to be shared across those who have direct influence on the sale.
    2. Overlay Splits, these are to be shared with anyone who helps in the sale, but may not have direct influence on the revenue. This can be any percentage of the actual opportunity total up to and even exceeding 100%
  2. Now that we know about the kinds of splitting, how do we set it up? Well, first we need to enable Team Selling as Splits and Team Selling go hand in hand. You do this by going to
    Setup->Customize->Opportunities->Opportunity Teams->Settings. Click the "Enable Team Selling" checkbox as seen below:
  3. You'll then have the ability to add the  Opportunity Team Related List to the Page Layouts that you have for Opportunities. You can do this later if you don't do it now.
  4. You also now have an expanded menu within Opportunity Teams that includes the "Opportunity Splits" category as seen here:
  5. This is where you can "Enable Opportunity Splits", doing so presents you with a few options and one big yellow box. These boxes and warnings like this usually are important. Make sure you read this before proceeding.
  6. If you desire you can edit the labels of the types of splits to have names that match your organization here.
  7. Click Save. You've now enabled opportunity splits for your organization, and all opportunities going forward will have them included.
This is just another way that you can provide additional features and functionality for your Sales Teams using Clicks and Not Code.

Friday, May 17, 2013

Summer '13 Release Series: Forecasting Using Quantities

As part of Summer '13 Salesforce has finally released the ability to use customizable forecasting with Quantities. This is long overdue. Here's how you can set it up:

  1. Go to Setup->Customize->Forecasts->Settings. You will need to ensure that Forecasts are first Enabled for the Org by clicking this checkbox:
  2. This will then enable a lot of options for you. Specifically under "Data Source" you now see a new checkbox for "Quantity" as shown below. Make sure to enable this.
  3. You need to make sure that you are using products and price books so that you can add opportunity line items in order for quantities to be part of the Oppty total. Once you have created an opportunity with an associated product which  has it's quantity, you can see that in your forecast as seen here. You must use the drop down on the right to see quantities as at first it will display the dollar amounts as usual:
  4. That's all you have to do to enable Quantity based forecasting, but if you are setting up forecasting for the first time, you want to look at the other settings closely to ensure that they work for you and your business.
This is just one more thing that Salesforce has made possible for you to do in Clicks not Code.

Thursday, May 16, 2013

Summer '13 Release Series: Improved Setup User Interface

Improved Setup User Interface:

The new improved setup user interface is actually quite nice. It is a feature with Summer '13 that can be found in Setup->Customize->User Interface. It is located at the bottom and is labeled as "Enable Improved Setup User Interface." But what does it do?

Here are the changes you will notice if you enable this feature:

  1. Setup will change. The layout of the sections on the left hand page will change. See this side by side comparison:
  2. Your upper right Menu bar will change. Setup is now broken out, for those who can see setup and config. Other end users don't see Setup, but do see My Profile and My Settings.
    1. Admin Users See:
    2. End Users See:
  3. Finally, what does My Settings look like? Well it's completely different and if you ask me a direction that Setup should take in general. Hopefully that's the plan for SFDC as we all know that Setup was due for a UI overall five years ago. Here's the landing page:
As you can see, this is a much cleaner interface with a more Web 2.0 view. This makes the end user experience much more cohesive. From what I can tell the options are all the same, as the old "My Settings" but the interface is just a lot nicer. This is yet another thing that you can do in Summer '13 release in Clicks Not Code.

Wednesday, May 15, 2013

Summer '13 Release Series: Global Actions

Define Global Actions

Global Actions, what are they? Global Actions are a new feature in Summer '13, allowing you to create records from a chatter post within SFDC. This is taking the Social Enterprise to a whole new level. You can create any object record right from your feed. Making your feed the one stop shop for all interactions.

How do I setup Global Actions?

Setup of Global Actions is actually very straight forward and easy to do. Here are the steps to doing so:
  1. First ensure that Chatter is enabled in your org. Go to Setup->Customize->Chatter->Settings and make sure the enabled Checkbox is set to "True" as seen here:
  2. Next Scroll Down on the same page and click the, "Enable Publisher Actions" this is what allows you to add/edit and update the Chatter feed buttons and icons:
  3. Now you need to create a Global Action. This is a new menu found under
    Setup->Create->Global Actions shown here:
  4. A Global Action as you will see can be made for any object, or it can be custom designed to do something extra that you wish. For this example, I will create a simple Global Action for Accounts:
  5. Now you are prompted to create a page layout. These are the fields that will be available in the chatter feed when the user clicks on your new button. Keep these to a small number as much as possible. ONLY use essential fields as seen here:
  6. Now that you have a page layout, you can set "Predefined Fields" if you may in fact know fields ahead of time based upon who would be creating these records. This can be done with system fields and formulas like a profile of the user creating the record.
  7. Now that you have setup your Global Action, you will need to add it to your Publisher Layout. Wait! What is a publisher layout? Well, it is a new menu added when you enabled Publisher Actions to your Chatter section in the Admin menu. Found at
    Setup->Customize->Chatter->Publisher Layouts. These are the actual layouts that are shown in the chatter feed. These can be customized on a per profile basis. This is HUGE, for enabling new buttons and controlling chatter a little more. Now you can control who can run polls, attach files, and even post to chatter based upon profile. Here we add the new button to the layout:
  8. Now check out what you've done in the feed:
  9. And as with any page layout you can change things up to make the new button more prominent for users to see:
Now you have officially setup Global Actions for your org. You can now go crazy by creating a new Publisher Layout for any and all profiles. You can create Global Actions for all of your objects or just a few that make sense. Have fun, and experiment with one more thing that you can do in Clicks and Not Code.

Friday, March 29, 2013

Dataloader.io

Dataloader in the Cloud

Are you a Salesforce.com Administrator? Do you use Linux or Mac? Are you frustrated with the options to use for Dataloader? Setting up WINE or using Lexiloader can sometimes can be frustrating because it was not made by Salesforce. Well kiss goodbye to your frustrations. 


Introducing Dataloader.io, dataloader.io is a tool that works 100% in the cloud, so irrespective of your operating system it just works. You can now do everything that DataLoader can do and more. Dataloader.io allows you to Save upserts and queries for later use. It also keeps a history of what you have done so you can refer back to it, in the event that something goes wrong.

  • Tired of scrolling through the list of Objects in your organization to find the right one? Dataloader.io has a simple search field to find it fast.
  • Tired of looking for the right field for data mapping? Dataloader.io has a searchbox for that too.
    • Not only that but if your fields in your CSV are close matches Dataloader.io will do a simple automapping for you.
    • Dataloader.io is great for mapping lookups for matching values. You can use the lookup field and access almost any field on the parent object to use as a match. This is GREAT! It means that you don't have to rely on Account Id's or things that might not make sense for the match. 
  • Best of all Dataloader.io makes it simple and easy to use.
This is just a short blurb, but I love this tool and I use it all the time.

Watch the video if you are still not convinced:


Friday, March 22, 2013

Email to Case

On Demand Email to Case

Salesforce.com offers two different ways to handle inbound email to case. By far the easiest to setup and manage is the On Demand Email to case. It can be setup with virtually no training, you don't need to know anything about SMTP or IMAP or POP or anything else that sounds like intimidating mail related lingo. You don't technically even need to have access to the mail server itself. Salesforce.com on Demand email to case has a few simple setup steps that are as follows:
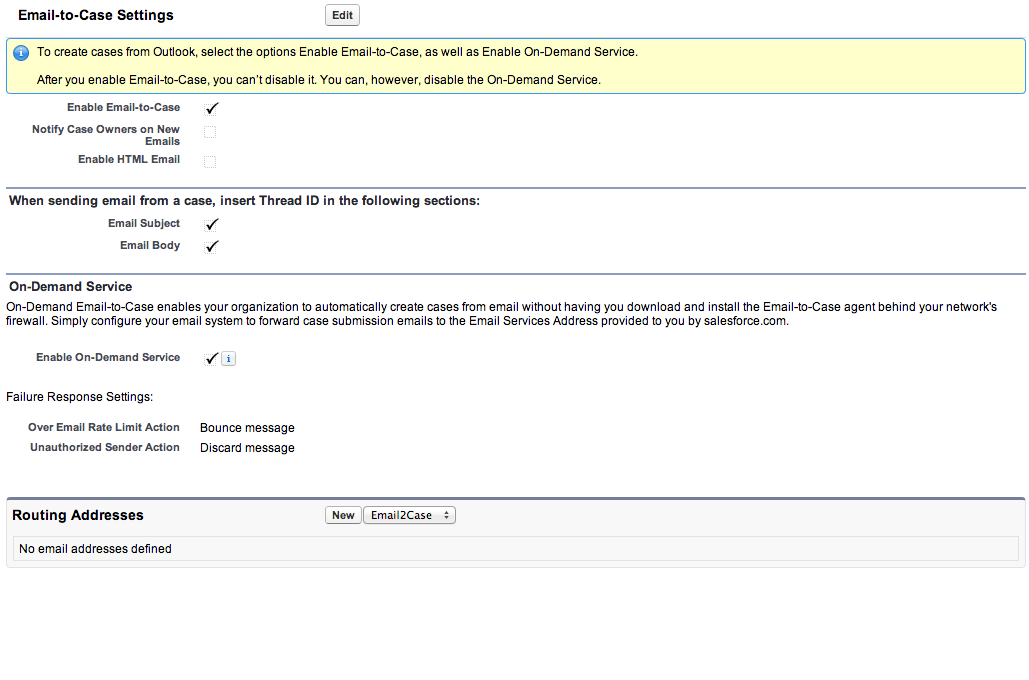
  1. First go to Setup-> Customize-> Cases-> Email-to-Case and click the edit button
  2. Check "Enable Email-to-Case
    1. This will make the "Enable On-Demand Service" available below on the same page. Select that too.
    2. You can also determine if you want to allow HTML emails in the system or if you want case owners notified of new cases when they come in, but this is optional and not required at this time. If your not sure what this means, then take a look at the SFDC Email to Case documentation found here.
  3. Hit Save
  4. Now you will have a new section as shown here that will appear below the Email-to-Case settings: 
  5. Setup a Routing Address by clicking the "New" with the drop down set to Email2Case.
    1. You will now be prompted to give the address a routing name. This is what will appear on the outbound emails or replies from that address. You may want this to be something like, "My Company Name Support" 
    2. The email address is what is prompted for next. You can use any email address you want, so long as you have access to the inbox you can use it. Remember you don't have to setup email to case with a mail server, although it is not a bad idea to do so. The point is that you don't have to.
    3. Save email headers
      1. Why would you want this? Mostly this is just something that you can use to evaluate the original header of the email. This is typically used in setting up rules for spam control. If you are using a mail server, you might not care to use this option as the original message should contain this detail on your mail server.
    4. Accept Emails from:
      1. This option actually allows you to make your inbound email to case inclusive only. This is extremely powerful if you only want to accept email from one domain address or specifically one address. You can put things like, "gmail.com" or "justtesting@none.com" You may also use commas to separate input.
    5. You can have every email that enters the system create both a Task and a Case. This can turn out to be a lot of overhead and extra work, so I wouldn't recommend that you select this setting.
    6. Set a default priority for the case as it comes in from that email address. This is especially useful if you do any type of Quality of Service or (QOS) by email address. For example if you had a "SUPER IMPORTANT CUSTOMER SUPPORT" email alias, you would want that to have a case priority of HIGH while other cases maybe come in at LOW or MEDIUM.
    7. The next step seems silly, to select a case origin. You are setting up email to case, the origin is obviously email, right? Well, not in every case. What this allows you to do is setup an EXTREMELY inexpensive integration. In this way you can leverage email to case to handle emails coming from a different system. Then maybe your Case Origin would be "Customer Portal" or maybe its an internal case and the origin would be something like, "Finance". At any rate you have options.
    8. Select Record Type
      1. NOTE: This option ONLY appears if you have more than one record type setup already. But this can be handy if you want to have you assignment rules do different things based upon record type of cases as they come into the system.
    9. Click Save.
  6. You should have got an email from SFDC in the inbox of the email address that you specified.
    1. Click on the activation link. It should take you to a pretty page like this:
  7. Now that you have verified the email address and setup everything in SFDC your done, right? Wrong! How are the emails supposed to get to SFDC? You have to setup a forwarding rule in your inbox or on your mail server.
    1. There are many ways of doing this, but the basics are as follows. Now that you have your address verified in Salesforce, go back to Setup-> Customize -> Cases ->Email-to-Case and copy the "Email Service Address" that appears on the right hand side of your newly setup email address.
    2. Take and setup forwarding inside of your email client or mail server to forward all emails from the original address to your Email Service Address. This will make sure that when you send an email to the address it ends up in SFDC as a case.
  8. You're Done!
You have now setup Email-to-Case for on Demand. This is the best option for setting up email in Salesforce.com to do using Clicks and Not Code. The biggest limitation to this option is that there is a 5MB cap on attachments. Salesforce will not process inbound emails for on-demand email-to-case if the attachment exceeds 5MB. 

Salesforce also offers a second option for Email-to-Case, that allows for larger sized attachments, this can be done through just "Email to Case" but is NOT on demand. For instructions on how to set this up, please go here.  A word of caution with this option, it is NOT supported by Salesforce. If it is not working, it is up to you and your IT staff to figure out why. This also is a complex setup that will require more technical resources to be involved.