Showing posts with label Email to Case. Show all posts

Wednesday, January 29, 2014

Email to Case: Specify From Addresses and Setting up Case Feed

The Question:

So this is a simple one, but the question seems to come up all the time, especially with people who are less familiar with Service Cloud. Can I specify the "From" address on case emails so it doesn't default to the Agent, but rather to a address that makes sense like, "Support@mycompany.com"?

The Answer:

Yes!

How?

Good question. The easiest way, is to use the coolest Service Cloud Feature. It's called, Case Feed. Haven't heard of it? Shame on you! It's fantastic, and will make your Techs lives better. Check it out today! 
I digress, the great thing about Case Feed is that it allows you to specify in the individual page layout the ONLY email addresses allowed as shown below, here's how I did it:

1-) ENABLE CASE FEED! This  might be the hardest step for many of you. But don't be intimidated, all of your existing case page layouts, record types...etc will stay intact even if you enable case feed. Also, you can have it on a user by user basis, so some users see case feed, and other users see the standard case page layout!

To Enable case feed go to Setup->Customize->Cases->Support Settings here you will check the checkbox that says, "Case Feed Enabled"

Ok, now it's enabled. What next?

2-) Next you'll have to  setup your page layout and record type. If you navigate to the case page layouts you'll see a new section. It looks like this:
The key here is to notice the middle section. Page Layout for Case Feed Users. It's telling that it says, "FOR CASE FEED USERS" this is Salesforce's way of telling you that only certain users will see these page layouts.  Also you should notice the little drop down arrow.

If your anything like me and come across something like this in Salesforce you have to click it, which you should do anyway.

You'll now be presented with three options:

  • Edit Feed View
  • Edit Detail View
  • Delete
Delete is straightforward and we'll skip that. Edit Detail View is going to be the "Detail" part of your new case feed. Or in other words where you add and remove fields.

The Feed View is where you get to introduce cool new stuff! Primarily where you can specify the "FROM ADDRESS(ES)". This is shown below:


Now that it's set your outcome should look like this:


Look how pretty! It defaults to my support address now. I didn't have to do anything else.


Notice that when I click on the drop down there is no other option available. Not even my own address. No longer do I have to worry about clients responding to an email from a tech and it going into the Technicians personal email box! It will always come back to salesforce.

The last thing that you want to do in setting up case feed is start to enable it for end users. To do that there is two things.
  1. Ensure that the new "Case Feed Page Layout" is assigned to a record type. (Just like you would any other page layout)
  2. (And this is VERY important), From the PROFILE update the "Use Case Feed" permission to TRUE.

That's it. You've both now enabled Case Feed, and narrowed the available Emails for a single page layout. Your support center can now send and receive emails flawlessly with Clicks and Not Code!



Friday, March 22, 2013

Email to Case

On Demand Email to Case

Salesforce.com offers two different ways to handle inbound email to case. By far the easiest to setup and manage is the On Demand Email to case. It can be setup with virtually no training, you don't need to know anything about SMTP or IMAP or POP or anything else that sounds like intimidating mail related lingo. You don't technically even need to have access to the mail server itself. Salesforce.com on Demand email to case has a few simple setup steps that are as follows:
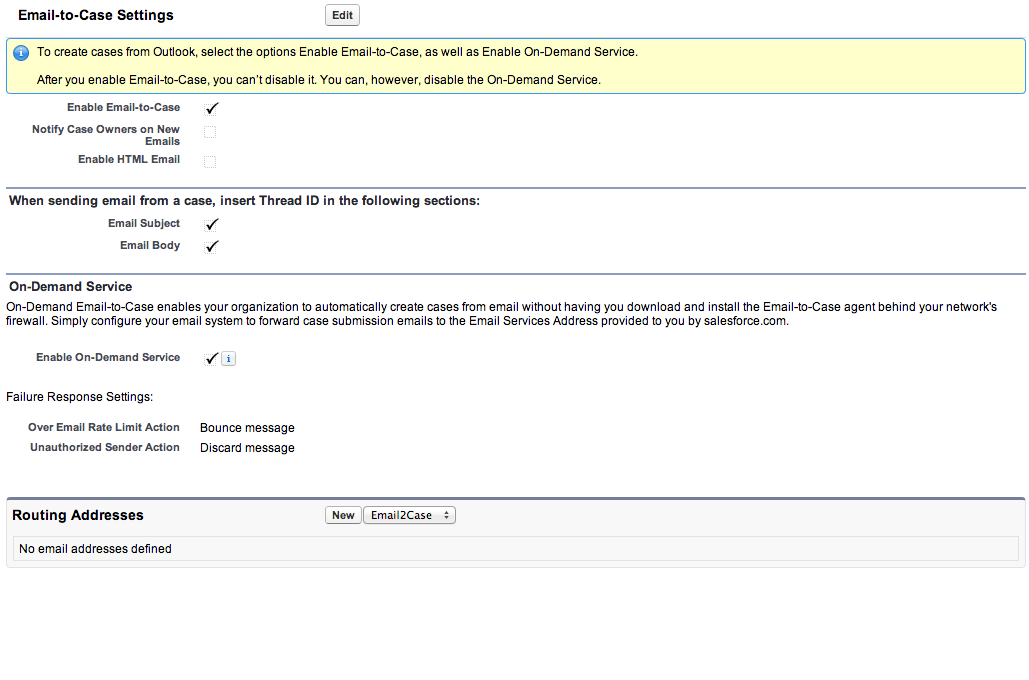
  1. First go to Setup-> Customize-> Cases-> Email-to-Case and click the edit button
  2. Check "Enable Email-to-Case
    1. This will make the "Enable On-Demand Service" available below on the same page. Select that too.
    2. You can also determine if you want to allow HTML emails in the system or if you want case owners notified of new cases when they come in, but this is optional and not required at this time. If your not sure what this means, then take a look at the SFDC Email to Case documentation found here.
  3. Hit Save
  4. Now you will have a new section as shown here that will appear below the Email-to-Case settings: 
  5. Setup a Routing Address by clicking the "New" with the drop down set to Email2Case.
    1. You will now be prompted to give the address a routing name. This is what will appear on the outbound emails or replies from that address. You may want this to be something like, "My Company Name Support" 
    2. The email address is what is prompted for next. You can use any email address you want, so long as you have access to the inbox you can use it. Remember you don't have to setup email to case with a mail server, although it is not a bad idea to do so. The point is that you don't have to.
    3. Save email headers
      1. Why would you want this? Mostly this is just something that you can use to evaluate the original header of the email. This is typically used in setting up rules for spam control. If you are using a mail server, you might not care to use this option as the original message should contain this detail on your mail server.
    4. Accept Emails from:
      1. This option actually allows you to make your inbound email to case inclusive only. This is extremely powerful if you only want to accept email from one domain address or specifically one address. You can put things like, "gmail.com" or "justtesting@none.com" You may also use commas to separate input.
    5. You can have every email that enters the system create both a Task and a Case. This can turn out to be a lot of overhead and extra work, so I wouldn't recommend that you select this setting.
    6. Set a default priority for the case as it comes in from that email address. This is especially useful if you do any type of Quality of Service or (QOS) by email address. For example if you had a "SUPER IMPORTANT CUSTOMER SUPPORT" email alias, you would want that to have a case priority of HIGH while other cases maybe come in at LOW or MEDIUM.
    7. The next step seems silly, to select a case origin. You are setting up email to case, the origin is obviously email, right? Well, not in every case. What this allows you to do is setup an EXTREMELY inexpensive integration. In this way you can leverage email to case to handle emails coming from a different system. Then maybe your Case Origin would be "Customer Portal" or maybe its an internal case and the origin would be something like, "Finance". At any rate you have options.
    8. Select Record Type
      1. NOTE: This option ONLY appears if you have more than one record type setup already. But this can be handy if you want to have you assignment rules do different things based upon record type of cases as they come into the system.
    9. Click Save.
  6. You should have got an email from SFDC in the inbox of the email address that you specified.
    1. Click on the activation link. It should take you to a pretty page like this:
  7. Now that you have verified the email address and setup everything in SFDC your done, right? Wrong! How are the emails supposed to get to SFDC? You have to setup a forwarding rule in your inbox or on your mail server.
    1. There are many ways of doing this, but the basics are as follows. Now that you have your address verified in Salesforce, go back to Setup-> Customize -> Cases ->Email-to-Case and copy the "Email Service Address" that appears on the right hand side of your newly setup email address.
    2. Take and setup forwarding inside of your email client or mail server to forward all emails from the original address to your Email Service Address. This will make sure that when you send an email to the address it ends up in SFDC as a case.
  8. You're Done!
You have now setup Email-to-Case for on Demand. This is the best option for setting up email in Salesforce.com to do using Clicks and Not Code. The biggest limitation to this option is that there is a 5MB cap on attachments. Salesforce will not process inbound emails for on-demand email-to-case if the attachment exceeds 5MB. 

Salesforce also offers a second option for Email-to-Case, that allows for larger sized attachments, this can be done through just "Email to Case" but is NOT on demand. For instructions on how to set this up, please go here.  A word of caution with this option, it is NOT supported by Salesforce. If it is not working, it is up to you and your IT staff to figure out why. This also is a complex setup that will require more technical resources to be involved.